Entities
Introduction
Sprite Configuration
To fully customize how your entities look like on the battle map, you first have to understand the concept of stances, or poses in LeTBS.
In battle, your entities are supposed to take different poses depending on their actions or what's happening. One such example would be a dead pose, which represents how the entity looks like when he is defeated, or an atk pose, which would be how the entity's sprite is supposed to be displayed when it attacks.
Important
By default, each entity has a default pose, idle and, if the entity is an actor, his character sprite would be used as such.
Also, you can have any pose you want, but LeTBS use these ones internally:
- idle
- dead
- atk
- skill
- victory
For example, the dead pose is called whenever an entity is knocked-out.
The following notetags let you define new poses or overwrite existing ones. They are supposed to be wrapped inside the letbs_sprite tag.
Using Characters
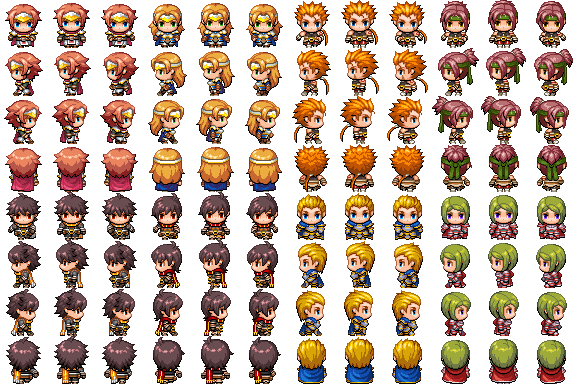
One way of representing how a pose looks like is using MV characters.
They may look like this:
or this:
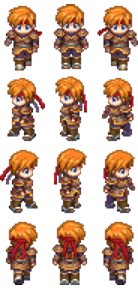
Both formats are supported and the notetag letbs_sprite.chara lets you use them:
<letbs_sprite>
chara(pose_name): character_name, character_index, [line_index], [frame_index]
</letbs_sprite>
In practice, here's how you use it.
If you're familiar with MV then you know that the first picture displayed in this section is in a fact a sprite called Actor1 inside your img/characters folder.
This is a character-set. Each specific individual in the set is located given an index, as such:
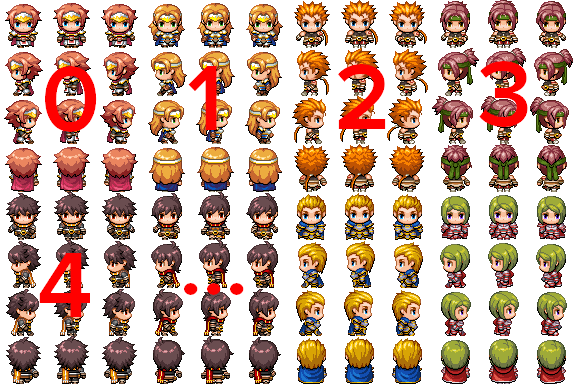
We just covered what character_name and character_index are. So, if we want to use the green haired guy as the idle pose, this is how the chara tag will be used:
<letbs_sprite>
chara(idle): Actor1, 7
</letbs_sprite>
When rendered, your entity will have this texture:
To explain the next parameter, line_index, let's examine another use case.
You're probably familiar with this another character-set:
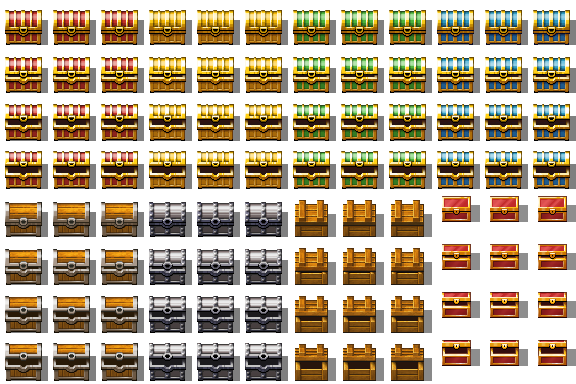
Its name is !Chest.
Let's say we want to use the golden red chest as our entity's sprite. But we do not want the whole sprite. We're only after this highlighted part:
We want our entity to looks like that all the time. That's when the line_index parameter comes handy. Just like how individuals are indexed in a character-set, each line of one character is indexed too:
It comes to light that we're after the line indexed as 2.
This is how the chara tag can be used to fulfill this use case:
<letbs_sprite>
chara(idle): !Chest, 0, 2
</letbs_sprite>
This is the resulting rendered texture:
As we wanted, the entity will look exactly the same no matter the direction it is facing.
On to the last parameter now. frame_index similarly to the previous parameters. character_index lets you isolate a character from the set, line_index let's you isolate a specific line from a character, and thus frame_index let's you pick a single frame inside of an indexed line.
In this use case, we want to add a dead pose to our green haired guy.
Let's extract it from this character set:
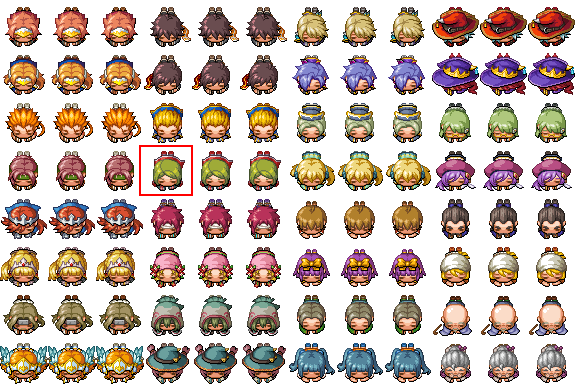
If you've followed until now, you know that to obtain that specific frame, we select first the index 1 from the character set, then 3 from the character itself, and finally 0 from the selected line. frame_index ends up being 0:
<letbs_sprite>
chara(dead): Damage1, 1, 3, 0
</letbs_sprite>
And we finally have our fully rendered sprite's texture:
You'll notice that the rendered texture is a single frame, without any sense of direction at all. LeTBS supports such format (see static images bellow).
Technical Note
The reason LeTBS still rendered the chest as a full directional sprite is a technical one. Pay no mind for now.
Using static images
In addition to characters and sprite-sets, you can use static images as a pose. A static image is an isolated, single framed image with no sense of direction.
Static images are used with the letbs_sprite.static notetag:
<letbs_sprite>
static(pose_name): filename
</letbs_sprite>
Important Note
Static images for LeTBS should be located inside your img/leTBS/battlers folder.
Let's see a quick example. We have this picture named Snake and we want to use it as an idle pose:

The tag to use would be:
<letbs_sprite>
static(idle): Snake
</letbs_sprite>
Using animations
In addition to characters and static images, you can also use animations as poses. You can define a single animation for a given pose, or provide an animation for each direction, for that same pose.
<letbs_sprite>
anim(pose_name): anim_id or down_anim_id, [left_anim_id], [right_anim_id], [up_anim_id]
</letbs_sprite>
This is an example of its usage:
<letbs_sprite>
anim(idle): 10, 11, 12, 13
anim(walk): 15
</letbs_sprite>
This setup defines two poses: idle and walk. For idle, an animation is used for each of the entities direction, and for walk, only one
is used for any direction.
Note
With this tag, entities get an empty bitmap. Under the hood, this tag relies on loop animations.
Using custom sprites
(WIP)
Conclusion
Sprite configurations can be mixed however you want and the letbs_sprite can be used on any game objects. As soon as the configuration change, the sprite is re-created.
This is an example of a mixed configuration:
<letbs_sprite>
chara(walk): Actor1_walk, 2
anim(dead): 115
</letbs_sprite>
In addition to this notetag used inside the actor's armor notebox:
<letbs_sprite>
chara(atk): $harold_atk
</letbs_sprite>
This set of configuration creates 3 poses:
walk, from a character setdeadfrom an animationatkfrom a character sprite
Note that by default an idle pose would be created too.
If suddenly our entity gets affected with a state with such configuration:
<letbs_sprite>
chara(idle): $transformed_xyz
</letbs_sprite>
The previous idle pose would be replaced and the entity's sprite recreated. Note taht this happens because states notetags have an high priority over other game objects.
Sprite Overlays
This functionality lets you draw sprites on top of your entities. For example, this is useful for displaying equipment in battle. This is done by using the letbs_sprite.overlay tag:
<letbs_sprite>
<overlay>
chara(pose_name): character_name, character_index, [line_index], [frame_index]
static(pose_name): filename
</overlay>
</letbs_sprite>
The overlay tag relies on chara and static seen previously. These tags load bitmaps the same way as explained, but with the difference of displaying them on top of the entitie's sprite.
Note
Notice how overlay is a nested tag, inside letbs_sprite. If you're not familiar with how notetags work in LeTBS, see this page. (WIP)
Let's say we have two accessories in the game's database. One hat and another one that grows a tail on your character! We'd want to display these accessories in battle. Here's how to do that.
First we make sure that we have the assets we want to display. In this case we are using those:
- The tail (named
$part_tail):
- The hat (named
$part_hat) :
As you can see, they are actually similar to the characters formats. As overlay relies on the same loading methods seen previously, the same format applies here. It's just like we're loading an entitiy's sprite, but it is rendered over what's already here.
To get the desired result, we need to put this tag inside the hat accessory's notebox:
<letbs_sprite>
<overlay>
chara(idle): $part_hat
</overlay>
</letbs_sprite>
And this one inside the tail accessory's notebox:
<letbs_sprite>
<overlay>
chara(idle): $part_tail
</overlay>
</letbs_sprite>
In battle, the entity's sprite will be rendered as such:
This tag can be mixed and used by all game objects.
Sprite Effects
Sprite effects are more ways for you to customize how entities look like in game, and dynamically. One set of these effects rely on the letbs_sprite notetag and can be used as such:
<letbs_sprite>
frame_delay: value
frame_order: frame1, frame2, ...
freeze: true/false
opacity: value
tone_color: r, g, b, a
scale: x_value, y_value
rotation: value
</letbs_sprite>
frame_delay
Represents the delay between each animated frame. The greater that value is, the "slower" the sprite will appear.frame_order
In RPG Maker MV, characters are animated in a specific order. If you look closely, the first frame is played (#0), then #1, #2 and lastly #1.
Given this character:
And assuming the entity is looking down, its sprite will be animated as such:
LeTBS respects this order by definingframe_orderas0, 1, 2, 1when a character is used as a sprite.
You are free to change this value however you want.freeze
When this parameter is set totrue, the sprite will stop animating. One use case is a freeze state that locks an entity in place.opacity- Should be a value between 0 and 255. The lesser the value is, the more transparent the sprite will be.
tone_color
Each set of value should be between 0 and 255. This parameter adds a tone to the sprite. A value of255, 10, 10, 0will dye the sprite in bright red.scale
This parameter changes the scaling of the sprite. A value of2.0, 2.0will double the size of the sprite, both in width and height.rotation
Rotate the sprite.
Note that these effects are applied dynamically depending on the entity's notetags inventory. Adding a state that contain these tags will update the sprites in real time.
Timed Effects
This feature is similar to how RPG Maker MV animations work: it is possible to trigger a flash or play a sound at the time of a specific frame.
The same concept applies here. The tag letbs_sprite.timed_effects lets you flash or shake the sprite, or play a sound at the time of a specific frame of a designated pose.
<letbs_sprite>
<timed_effects>
flash(pose_name): frame, target, color, duration
se(pose_name): frame, volume, filename1, filename2, ...
shake(pose_name): frame, target, power, variance, duration
</timed_effects>
</letbs_sprite>
target is either screen or sprite and color should be in the hexadecimal form (like #ffffff).
One use case of timed effects is playing a random step sound when the walk pose is played:
<letbs_sprite>
<timed_effects>
se(walk): 1, 80, step1, step2, step3
</timed_effects>
</letbs_sprite>
Or, shaking the screen while a VERY large monster is walking:
<letbs_sprite>
<timed_effects>
shake(walk): 1, screen, 30, 20, 3
</timed_effects>
</letbs_sprite>
I invite you to browse these tags into the Master List of Notetags.
Teams and AI
Tweaks
- Update hooks.
← Resources Battle Maps →